Pages

Saturday, December 31, 2011

{ pattern paper vase }

Happy New Year's Eve to everyone! I can't believe
2011 is already at it's end! What a wonderful year full of 
blessings and fun! 
I haven't come up with a resolution this year, but I have
come up with a few goals. I plan on finishing my bedroom and 
my children's bedroom! I know... 3 years in a place
you'd think they would be done by now. I 
started pulling things out of my room that have
gathered in there over the past year. I had an idea of how
I wanted my room and then changed my mind! So I 
have some things that need refinishing to bring them
up to speed with my ideas. I wanted to finish
the year with one last post. 


Believe it or not, this vase was, only a few hours ago, red and gold! 
I've seen a lot of people using old sewing patterns in their 
crafts lately. And since I'm in love with all things
vintage and "make do" I really wanted to bring this element
into my decorating as well. 
So here you go! A refinished vase!

What you'll need:
* Vase
* Elmer's school glue and water
*Sponge paint brush
* Old sewing pattern ( I picked mine up at Goodwill
for $.50)

OK... Here's the vase. 

Put about 2 quarter size amounts of Elmer's glue
in a bowl. Add a little water to thin it out. I didn't
measure how much water I used but it was close to the
same amount of glue I used. Mix it up well.

Now just spread your glue mixture onto the vase. 

Start putting pieces of your pattern onto the glued areas.

Cover completely. This is one layer of  paper.
You can see that is is transparent (pattern paper is very thin).

Go ahead and add as many layers as it takes to cover
your vase. I used about 3 or 4. 

Allow it to dry completely.
Once the paper has had plenty of time to dry, you'll see
that the coverage is better, too.
That's it! You can use this method on just about
anything! Frames, jars, bowls, etc. And you 
can also use other types of paper; book pages, pattern
paper, or sheet music.


Thank you all for visiting my blog this year! It's been fun
to share all of my crafting adventures with
you! I'm hoping the new year with bring 
giveaways and contest (with prizes)! So keep 
checking it out and don't forget to follow A Lott Of Ideas!

Thursday, December 15, 2011

{ cookie dough pops } recipe

Today is Ryker's last day of school until next year! 
I'm excited for the break and so is he! I really
enjoy having him home and watching him
soak in the free time! :)
He wanted to bring a Christmas treat to school 
for all of his classmates. I have personally
been wanting to try a treat that I saw on this blog
back in October! Cookie dough pops!!
What a wonderful idea! 
And with no eggs at all, it's OK to eat raw!


On a side note, I'd like to encourage you to use cuter
sprinkles than I did! When you live in Hawaii, it isn't
a rare occurrence for Wal-Mart to be "out" of things.
Unfortunately, on the day I needed cute sprinkles,
they were out. These ones were the only 
sprinkles in the whole place!

What you'll need:
* 6 inch lollipop sticks
* A brick of almond bark
* CUTE sprinkles
* Cookie recipe and ingredients
* Wax paper
* Foam block

Ingredients:
2 1/4 c. all purpose flour
1 tsp. baking soda
1 tsp. salt
1 c. (2 sticks) butter; softened
3/4 c. granulated sugar
3/4 c. packed brown sugar
1 tsp. vanilla extract
1/4 c. milk
2 c. (12 oz pkg) semi sweet chocolate morsels.

Start by combining the flour, baking soda, and salt in a
small bowl. Mix it well and set it aside.

Now, in a large bowl, combine butter,  sugar, brown sugar
and vanilla. Beat until creamy and well mixed.

Add milk and mix well.

Gradually beat in flour mixture.

Stir in morsels.

Line cookie sheets with wax paper.

Roll balls of dough about an inch wide. Lay
them out on the wax paper.

Melt almond bark in the microwave.
Follow the instructions on the package.

Now dip your lollipop sticks into the almond bark and
then stick them into your cookie dough balls.


Freeze pops for 20 min.

Once the pops are firm, take out a few at
a time and start dipping them into the melted
almond bark. You may have to reheat it often.
The pops coat better when it's hot!
Tap them on the side of your bowl to remove
excess coating.

Quickly sprinkle with cute sprinkles!
Ryker was in charge of this part! He was in 
sprinkle heaven! :) 

Now poke the stick of your finished pop into 
the foam block so it can harden.

Once the coating has dried, you can wrap
them with Cello wrap or tie them with a bow. 
This just happened to be another thing Wal-Mart
was out of yesterday when I was picking
up supplies! No small, clear Cello bags! Sigh...

So they were put in these big "surfer santa" bags.


The extras will be going with Jake to work tomorrow! 
Hope the ladies like sugar! :)

This recipe makes between 40 and 50 pops! 
Enjoy!


Thursday, December 8, 2011

{ poinsettia tree skirt } Christmas

I've never really had a tree skirt because I've never
really liked any that I've seen! They're either too 
country, too traditional or just not my style in general.
The other day, I decided that I needed one though!
So I started searching the web for inspiration and 
found one that caught my eye from Garnet Hill!
 I had to remake it for myself! It was 
from last year so they don't even sell it anymore 
but it's perfect for  me since it can go with
whatever I decide to decorate with next year!


What you'll need:

* 1 and1/4 yards of felt
* Scissors
* Sewing machine and thread
* Hot glue
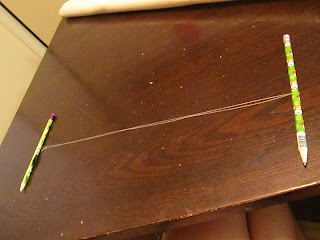
* 2 pencils and string or thread

(Sorry that some of my photos are dark! I started
working on this in the late evening! )

I started by squaring off my felt, and setting
the extra aside. It was a squared piece
about 36 inches across.  I took a piece of string, and made
it 36 inches long. Tie the two ends together. Now put your 
pencils in the looped string. Now, from pencil to pencil
should roughly be your radius ( measurement from 
center of a circle to the outer edge).


Now hold one pencil in the center of your felt 
square. ( If your piece is a perfect square, you can
find the center by folding it in half and then in
half again the other way. The folded corner will be your center point.)
Now pull your string tight with a pencil in each
hand. Draw with your outer pencil, keeping your string
tight and center pencil still, around in a circle. This is similar to using
a protractor in math class!


Using any small round object, draw a circle in the
center for the tree trunk. I used a small Tupperware lid.

 Now, using a ruler or straight edge, draw a line from the
center point to the outer edge of your circle. 
( ignore my first line... it obviously wan't straight! haha)

Cut everything out and cut down the straight line.
  
Keep all of your scraps, you'll need them to cut out all of 
these little strips to make the poinsettias. Cut out 
as many as you can with the scraps you have. I cut out
over 300 of them! They are 3 inches long and 1/2 an
inch  wide. I cute out 3 layers at a time and
it sped up the process!

Once you've cut out all of your strips you need to
sew them. Lay one piece at a time down on the machine.

Fold it in half.

Slide it under the presser foot, centered. 
Sew down and back stitch
Do not cut the thread. Repeat with 
remaining strips.

You will end up with a long strip of these if you leave
the thread uncut. At the end, you can cut them all apart.

The next step is to assemble the poinsettias. Use a
very small dab of hot glue to the center of 
one sewn strip.

Now add another strip to the top, perpendicular.
Add a third strip to half of your poinsettias.

You will have half " x "shaped and half "* " shaped.

Now stagger them around the edge of your skirt
before attaching them to be sure you have enough to
go around and to make sure you don't put too
many in an area.

Now use a dab of hot glue to the bottom of each
and attach to your skirt about half inch from the edge.


You can add ribbon to the bottom side of the 
skirt, down the opening, to tie it shut. 
I haven't added my ribbon yet because I didn't have
a coordinating color on hand!


 Cute, huh!?
Total cost?...... $4
Enjoy!