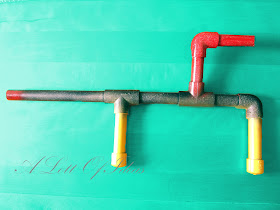
It's always a challenge to find enough activities to keep school age
children occupied throughout the summer months! Eventually, all of the fun
things begin to get old and you find yourself with a child (and all of their friends)
asking for advice on fun, new things to do with their time! Luckily for me,
I have a husband who loves to create things as much as I do! So, Jake
saved the day this time! Thank goodness!
What you'll need:
* 1/2" PVC pipe (approx. 29 inches long)
* 2 - 1/2" "T" connectors
* 2 - 1/2" 90 degree connectors
* 2- 1/2" caps
* Pipe cutter
* Weld-On PVC glue
* Cotton swabs
* Disposable rags
* Spray paint
* Mini marshmallows
First you need to cut your PVC pipe into smaller pieces:
1- 8" piece
3- 4" pieces
1- 3" piece
2- 2 3/4" piece
Using the knob on the end of the cutter, you can loosen and
tighten the pizza cutter like blade. Tighten onto the pipe and spin
it around. Tighten after each spin until the pipe is cut through.
Lay out your pieces to prep for gluing
Marking your pipes before gluing is the best way to ensure everything
lines up straight. To mark them, assemble the marshmallow gun prior to gluing.
Using a pencil, mark at the joints ( vertically and horizontally ) and then match
up these markings once you've glued. It is more difficult to make corrections
once the glue has been applied.
Line these up when you put your pieces back together after gluing.
**This glue can be a real mess! Try very hard not to get it on your clothes
or anything else you don't want ruined. Lay down a disposable rag
or newspaper to work on. Work in a well ventilated area or outside to
avoid fumes.
My husband used a cotton swab instead of the large applicator that comes
with the glue to avoid dripping as much as possible. Dip your cotton swab in the
glue. Wipe a generous amount of glue around the outside edge of the pipe.
Moving quickly, wipe a generous amount of glue inside the fitting.
Now, fit the two together, lining up your markings. The glue grabs fast,
so move quickly to make adjustments easier. Use a disposable rag to wipe
any glue that has oozed out. Avoid getting it on your hands.
Continue gluing the pieces together as they are shown in the image above.
Now spray paint! We let my son paint his own (with help)! It turned out
very colorful! Allow the paint to dry over night.
Now gather some ammo
(aka: mini marshmallows)
Place one mini marshmallow into the top chamber.
Now blow bursts of air into the chamber. The marshmallow will
shoot out the barrel of the gun! Make sure you teach your child
not to inhale while they prepare to blow the marshmallow out to avoid
the chance of sucking the marshmallow back into their mouth and possibly choking.
The marshmallow gun was such a hit with our son's friends that my husband
is now on back order making them! The best part is that it cost a total of $5!


