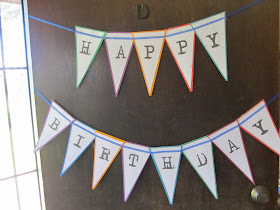
I'm sure you've seen these cute banners all over the
internet! Maybe even in peoples homes. Well, I now
have them in mine! It's such an easy project for so many
have them in mine! It's such an easy project for so many
occasions or even decor.
The idea to make the banner came to me a few days ago
while I was making a list of things to get for my son's
while I was making a list of things to get for my son's
birthday party. Yep... My big boy turned
6! :) So I went ahead and pulled out my
6! :) So I went ahead and pulled out my
paper!
My obsession with old literature and the paper it's made
from has inspired me a LOT! I want to put it on everything!
So although book pages are my paper of choice, you can
What you'll need:
1. Paper (printer paper, card stock, construction paper,
book pages; whatever kind you want)
2. Ribbon, yarn, or string ( again, whatever you want)
3. Scissors(or paper cutter) and glue.
4. Sewing machine and/or printer (optional)
OK... So I printed my letters onto my paper with a
computer and printer. I used half sheets of paper. I just cut
them down to size. I set my margins to match that of
my paper, used the center alignment, and put one
letter per page. You can use stamps or even
letter per page. You can use stamps or even
just write your letters on with a marker
I found the center of my paper using a ruler and
marked it at the bottom of my paper. This is just
so I knew my letter would be center in my triangle.
I then cut from that center point to the top left corner of
my paper and then from that point to the top right
corner. You should have an even triangle and
corner. You should have an even triangle and
your letter should be centered.
Now cut them out again using your scissors or paper
cutter. The card stock should be bigger than
your letter paper so you can see the color! That's
your letter paper so you can see the color! That's
it for your flags!
For the birthday banner I used blue ribbon to hang it.
I sewed the ribbon to the front of each triangle
using the sewing machine and
overlapped them a little bit so it wouldn't
be too big for my front door.
For the "Boo" banner, I attached ric-rac using the
sewing machine. I only tacked it down on each side
of the triangle. I left a one inch gap between the
For the "love" banner, I left an extra inch at the
top of each flag and just folded it over
my textured yarn and secured them on with
my textured yarn and secured them on with
clothes pins for a cute vintage look!
These are just three simple ways to hang your
flags. Don't forget to leave enough ribbon/string
at the ends to hang it! Can't wait to hang my "Boo"
banner on my door this October!
at the ends to hang it! Can't wait to hang my "Boo"
banner on my door this October!


No comments:
Post a Comment
I'd love to hear from you: