Sunday, January 22, 2012

{ party favor pouches }

I must admit that I'm a " don't eat to much candy" kind of mom. 
I don't let my kids eat it hardly ever. My husband, on the other
hand, comes home with a bag of candy every day
after work! 
I usually just fill cellophane bags with candy for party
favors because it's easy and cheap and I know
most kids love candy. For baby girls birthday, I decided
to mix it up a little. 


I've just made a pouch that slips over a bottle of water
that holds just the right amount of sweets and an individual drink
mix packet to add to your water! 
With all the Valentine candy out in stores now, it's so
easy to find candy for a girl party! Everything 
has hearts or pink on it!

What you'll need:

* 12x12 sheet of pattern paper
* Paper cutter (or scissors)
* Glue
* Bottled water
* Treats
* Drink mix
* Ribbon, stamps, and embellishments (optional)

Get your 12x12 paper

 Cut it down into 3 pieces. 4 inches wide each. If your treats
are all narrow, like suckers for example, you could cut these down
even more narrow and get 4 pieces, 3 inches wide each.
It just depends on what you're stuffing your pouch with!

Now you will mark the paper at 3 measurements. Starting at the bottom
edge, mark your paper at 3 inches, 8 inches and 10 inches. These will
represent where to fold your paper.


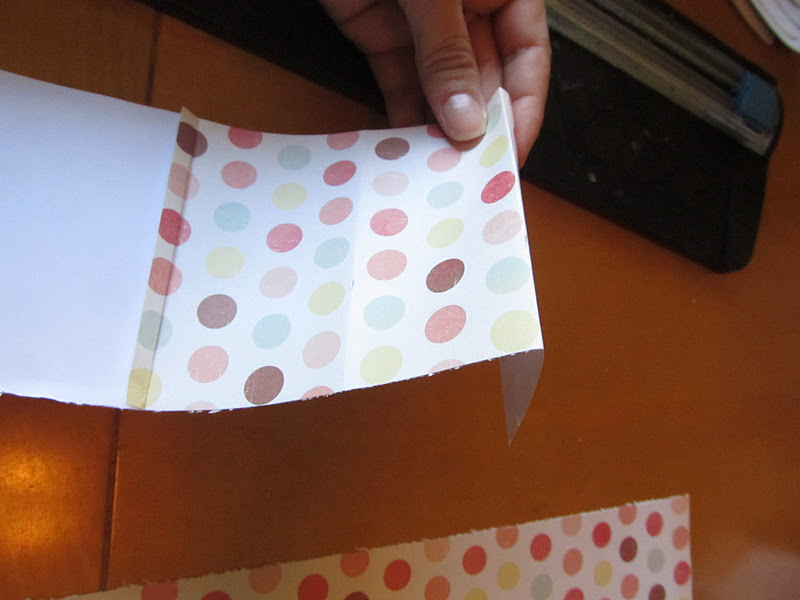
Fold the 3 inch line forward ( pattern touching).
Glue, starting 1/8 in from the very edges up to the fold on
each side.


Now fold down the very edge

Next, move up to the top and fold it at the  10" mark.
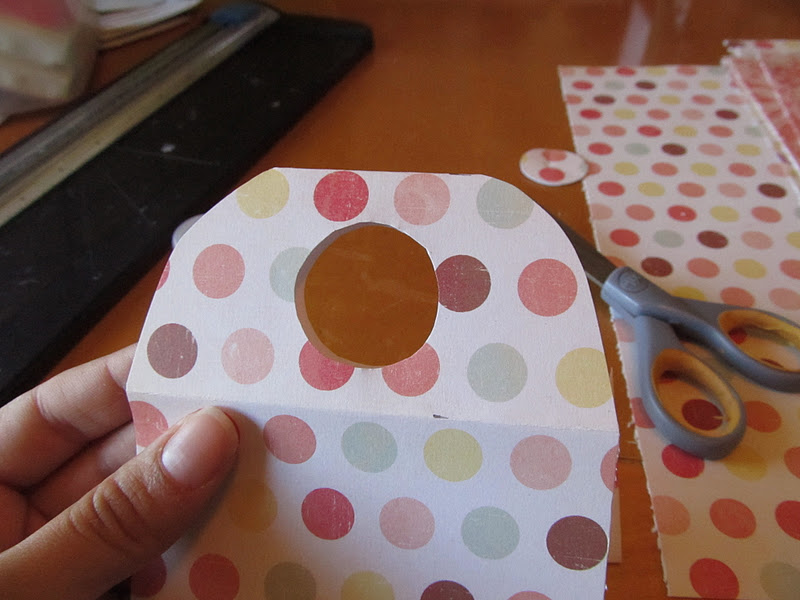
Now trace a circle on the center of this flap. I used the lid
of a bottle of water since that is what this hole will
be slid over

Cut out the hole through both layers of paper


Now fold your paper at the 8 inch mark.

Round the corners
I used a simple stamp to brighten up the front! There are really
endless possibilities on how cute you can make  these!


Now stuff your pouches

Slip them over the top of your bottle and add some ribbon!

Done!
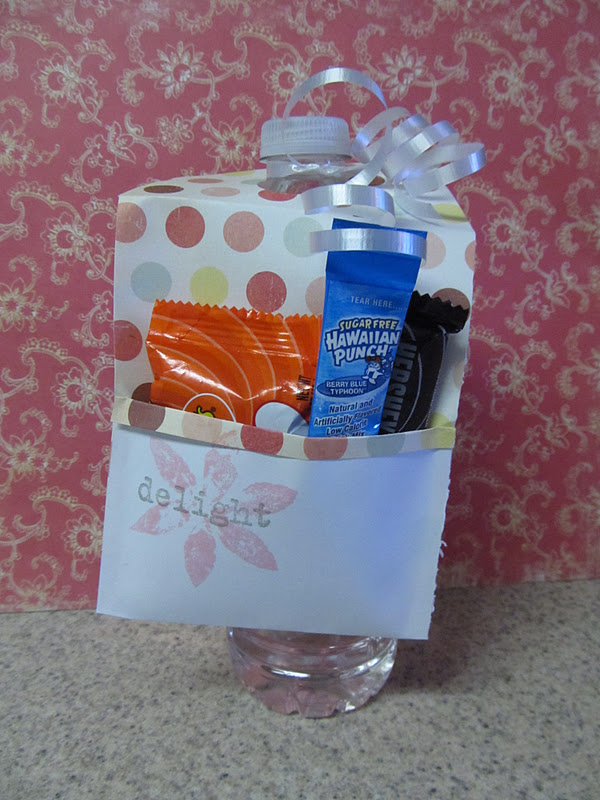


total cost for 16 favors: $8 

Tuesday, January 17, 2012

{ bunting inspired invitations }

Incredibly enough, it's the middle of the month already! Where,
oh where is the time going!? I feel like I've been so busy
lately. But, really, I've only done a few projects and 
mostly crocheting! :) Time to get some more projects complete!


My baby girl is turning 4 tomorrow 
(then no more birthdays 'til September)!
We are celebrating this weekend with a tea party
and then a BBQ. I finally made the invitations!


I was walking through Goodwill the other day and found a pack
of invitations for $0.50. This is significantly less than what
I usually spend on invitations. Even home made ones! It actually 
costs me more than that for just one piece of card stock at
my local scrapbook store. So, needless to say, I bought them!

What you'll need:

* Invitations or card stock cut to invitations size
* Craft paper or paper bag
* Pattern paper ( I used scraps)
* Scissors
* Glue
* Sewing machine with coordinating thread
* Embellishments (optional)

Here is a photo of my fifty cent invitations!

Start by tracing the section you want covered onto
your craft paper. Then cut the piece out.

Glue it down and trim the edges. Set the invitation aside.

Cut out small triangles from your pattern paper. I used
7 different papers. 


Now, line them up on your invitation how you want them.
you can draw a line or use some string to help 
you out if you want. I just eyed mine up and then used it
as a visual for the others. 

Now glue your flags down. I only put a small amount
of glue on the top edge so the flags didn't lay flush. 


Using your sewing machine, sew along the tops of the
flags from one side to the other and then reverse stitch
back to the beginning. Don't worry about staying on the
same line. It looks cute to have them a little crazy!
And don't forget to sew it 
with the invitation open! 
Don't want to sew it closed!


Now you can add any embellishment your little heart desires! 
I kept mine simple and just added a flower with
a button brad!  


Such an easy way to make those left over invitations from 
last year work again this year! 
Total cost for 10 invitations: $0.50


Tuesday, January 3, 2012

{ shabby chic bedroom furniture } old new again

I've finally started on my bedroom! I'm really excited
to get it done! The only thing I'm having trouble with is deciding
what color to paint the walls. In the meantime, I've
got a few projects to finish anyway. This weekend
I re-painted my dresser and nightstands. When we
first bought them (second hand), we had painted them black
because at the time I really didn't have an idea
of how the bedroom would be decorated. 
And now that I've redone them, I LOVE them! 

(don't mind that my bed isn't made)

This is an inexpensive way to make your
furniture fit your decor without having to go
out and buy new pieces. 

What you'll need:
*  A pint of flat paint.
* Paintbrush and small roller
* 120 grit sand paper

Here's the nightstand. Go ahead and take the
drawers out. I wanted to paint my hardware
to give it that worn vintage look as well. 
Depending on your preferences, you
can tape the hinges off or remove the doors
and hinges until after you've painted.

Use some sandpaper and scuff up the finish a bit. This
helps the paint stick. Wipe off the dust.

Lay down some newspaper or a drop cloth under
the nightstand to avoid a mess.

If you're lucky, you'll find one of these, too! Score!

I used BEHR's antique white, interior flat paint.
I've found that gloss paints peel off really easy. 

Using your roller, paint your surface completely. I like to
avoid the paint tray when using this little roller. 
You can just dip it into the can and let it drip off a 
little. Way easier and less mess to clean up.

You may have crevices that you can't get with the roller.

 Use your paintbrush for these parts. 


The first coat will be thin, especially if your
going from as dark as I did, to as light as I did.
Once the first coat is dry, add a second coat.

DO NOT put a second coat of paint on until
the first coat is not longer tacky. If you try
to add a second coat before the first is dry, it will
just lift the first coat.

I recommend you let the second coat dry over night. 
If you are going to sand your piece of furniture,
it will gum up if it isn't completely dry.

Now it's time to age your piece. Use your sandpaper
and scuff up the new paint. Focus on the edges, corners
and other details in the wood.

 You don't have to sand every part. I like to make 
it look less intentional and more natural. Have fun
with it! Don't worry about making it perfect.

Here are a few more detail shots.


If you've used newspaper, it's probably stuck to the 
bottom of your nightstand. 

 Just use your sandpaper and sand it off! 

Make sure you use a rag and wipe off all the dust
from sanding before bringing it into the house. Put
your drawers back in and put your doors and 
hinges back on if you removed them.

This is an easy way to make your old furniture
new again. Total cost to redo 2 night stands, a dresser
and a headboard:  $15


Enjoy!