Friday, January 18, 2013

2013 Birthday {Giveaway|

GIVEAWAY CLOSED!!
Scroll down for winners! 
Contact me at kandislei@yahoo.com 
to claim your prize! Congrats to the winners
and thank you all for entering!

I can't believe it's already been another year! But, it has! So to celebrate
I'm going to go ahead and give away some stuff this week! I have 4 prizes up for 
grabs this time around. And, one of which is from Savage Designs Tutu's
 4 prizes means 4 winners!

Thank you all for your support throughout another year! 
Now, onto the prizes!!

Kandislei Co. is giving away any hat or headband! 
Any size, any color, any design! You can customize all you like!
Winner: #18 Jeanita

A Lott Of Ideas is giving away the i {love} Chevron banner! You 
have the choice between the white ribbon or the gray ribbon.
Winner: #6 Salli

A Lott of ideas is also giving away this super cute little boy chevron neck tie!
It will fit young and old! The tie is adjustable on an elastic band.
Winner:  #15 Jessica Lynn


And finally.... Savage Designs Tu Tu's is giving away a FREE custom made tutu to the lucky winner! 
This tutu can be any size; newborn all the way up to adult size and can be made in
any color combo you choose!! 
Winner: #2 Julie Gardner

Savage Designs is also offering EVERYONE who views the giveaway 10% off  anything in her
Etsy shop! Just use code Savage10 at checkout!


Ok... I'm going to try to make this short and sweet!

To enter you MUST: 
(just click the links and it will take you directly to the pages)

This counts as one entry! Please leave a comment at the bottom of this post telling
me that you have liked all 3 pages! 


Now, extra entries:

ENTRY # 2: Share this giveaway on Facebook and tag A Lott Of Ideas or Kandislei Co. in
the post! This will help me verify that you have completed this step! If you have completed this
step, comment on this blog post telling me that you have done so! 
{ You can repeat this step once per day until the giveaway ends for additional entries }

ENTRY # 3: Share this giveaway on Pinterest and  tag A Lott Of Ideas or Kandislei Co. in
the post! This will help me verify that you have completed this step! Done? Go ahead
and comment below telling me that you have completed this step.

ENTRY # 4:  Show some love! Leave a comment and introduce yourself on all 3 pages 
participating in the giveaway for another entry! Just don't forget to leave ANOTHER comment
on this post telling me you've done so.

Giveaway ends at midnight HST on Friday January 25, 2013. Winners will be chosen by random.org.
Winners will be announced on this blog on Saturday January 26, 2013. Winners will be given
48 hours to claim their prize. If any prize has not been claimed in that time,
 I will draw a new winner! If you leave your email address in your entry comments, I will email
you if you win to ensure you get your prize, but please put your email address down similar to the
example so that you don't get marked as spam!  Example.. somebody at gmail dot com
Good luck! Just don't forget to leave individual comments for each entry! Each comment only
counts as one entry! And of course, this giveaway is in no way associated with Facebook! :)

{ And Good Luck!! }


Wednesday, October 17, 2012

{ vintage produce box }

I needed a place to put my decorative gourds! 

What you'll need:
* 1/8" pieces of wood
- 6 at 2.5" x 12"
- 4 at 2.5" x 6" 
* 1" square posts
- 4 at 6 1/2" long
* a piece of 1/8" ply board
* dremel or sander
* paint
* stapler ( not a paper stapler, one for wood)

Start with your 1/8 inch pieces.

Use your Dremel tool to sand the edges.

Now take one of your 1/2 inch posts.

Attach,with staples, one of the 12" planks square and flush to the side top side.


Now attach a 12" plank to the bottom of the same post. 
Allow the plank to over hang 1/8".

Attach a second post to the other side of the planks. Flush
with the top, 1/8" over hang on the bottom. 

Staple a third plank diagonally across the others. 
Repeat to make a second piece like this.

Connect the two sides by stapling a 6" plank on to
the posts.

Repeat on the other side.

Next, attach the last two 6" planks to the bottom ends of the posts.
Remember to leave the 1/8" over hang here as well.


Set the frame on top of an 1/8" piece of ply board and trace the interior
of the frame onto the board. Cut this out.


This piece should fit perfectly in the 1/8" overhang and be flush with
the side planks.

Dab some wood glue  on the bottom of the posts.

Staple the bottom into place.

I painted my box with a water- paint mixture. It looks more worn
and vintage than paint alone.

Allow it to dry and fill with decorative gourds or pumpkins.


Friday, October 12, 2012

{ witch hat door decor }

No Halloween wreath this year. I couldn't think of anything and October 
kind of snuck up on me. When I lived in Utah I had made a very
similar (OK, almost exact) project. I believe my mother-in-law is the 
rightful owner of it now. I really did love it though so I made myself another!

What you'll need:
* 1/8 inch thick sheet of wood
* pencil
*  scroll saw
* dremel (optional)
* sander
* paint
* drill
* wire

Ok, I just free-handed what I wanted out onto the board. I 
have a witches hat, spider, and sign board.

Cut the important pieces out.

I drew on the details with a pencil.

I then used my dremel sander tool to round the edges and also
to add dimension in the detailed parts. 
Now paint.

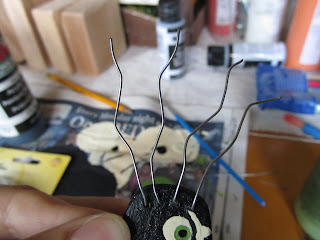
Before I painted my spider, I drilled 9 holes into it. One a top center,
 and then four on either side. This is where his legs will be so drill 
them where you think they'll look best.

I cut 4 pieces of wire, each about 5 inches long. 
Thread one through the first leg hole and out the hole directly next to it.


Repeat in the next two holes and then on the other side of the spider.
Use a pair of needle nose pliers to 'zigzag' the legs.

Drill holes on each end of the sign board. Then center it  along
the base of the witch hat. Mark on the witch hat directly above the
holes on the sign. Drill these also. Connect with a long piece of wire.

Use a pencil to wrap the excess wire around to create curly-cues.


Drill a hole in point of the witches hat and attach the spider with wire.
Add vinyl or paint your own saying or quote.

Attach a hanger to the back of the hat and hang it on your door.


Thursday, October 11, 2012

{ fall leaves art } kids project

I remember as a child, my mother would take my brothers and I into the canyon
and let us pick out all the fall leaves we could carry. They were beautiful reds, 
oranges, and yellows. We would bring them home and glue them onto paper in any
way our hearts desired. 


We don't necessarily have fall here in Hawaii. For the most part, everything
stays nice and green. Fall is definitely different for my kids than it was for me.
My mother sent a box for the kids last week and it was full of fall leaves! I was so 
excited to share a childhood tradition with my own kids. 

What you'll need:
* fall leaves
* white school glue
* white paper

Simply glue the leaves onto the paper!


At first all 3 of my kids were a little sceptical about what they were supposed to do. But
once they got a leaf on the paper, they were ready to do their "project". 
It was a lot of fun. They loved sharing with Daddy when he got home from work as well!


This is a fun family project you can do with the kids over the weekend!