Showing posts with label gift. Show all posts

Friday, May 25, 2012

{ pencil nameplate } teacher

The school year is over here in Hawaii! At the last minute my husband and I 
put together this nameplate for Ryker's teacher. Ms Arakaki was so wonderful!
She really dedicated herself to teaching her class and making sure that
everyone felt included and loved! What a wonderful woman!


What you'll need:

* 12" long 2x4
* Saw and sander
* Paint
* Vinyl lettering
* Jute and/ or yarn


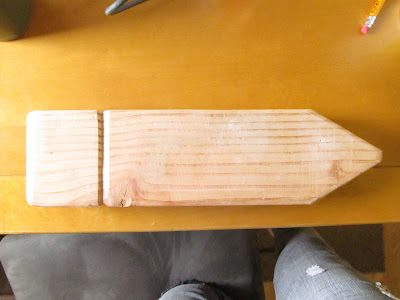
My husband was wonderful and cut out and sanded the piece of wood for 
me! You need to cut the tip of the pencil  this shape >. Then, using a
sander ( belt sander is best) run the edge around the other end to define the eraser.


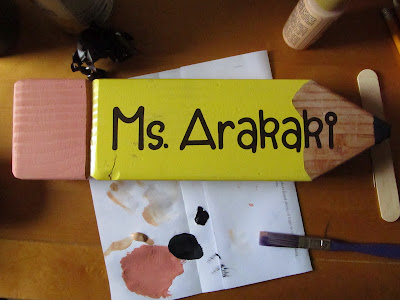
Go ahead and paint your pencil. Allow it to dry completely.

 I cut my vinyl lettering out on the Cricut. I used " Making
the Grade" Cartridge. I cut Ms. Arakaki at 1 1/2 inches. Ryker at 1 inch.

Center on your pencil and press it on.

Peel off the masking...

I put Ryker's name and the year on the bottom.

I finished off by tying some jute and textured yarn around the groove
that separates the eraser from the body of the pencil.


I wrapped a little bit of tissue paper around it.

This would be great  for a first day of school, teacher appreciation week,
or just because your child has a wonderful teacher! 


Monday, June 27, 2011

{ baby onsie cupcakes }

Baby gifts are so fun! You get to be so creative!
here is a cute idea for a baby shower gift or even a birthday gift!

What you'll need:
  1. Baby onsie/body suit
  2. Baby wash cloth
  3. Coffee filter
  4. Ribbon

Start with a onsie.

Lay your onsie front down. Fold the sleeves in toward each other.


Now fold the body suit in half with sleeves toward
the inside.

To make the dollop of cream on top:
Make a fist. Lay your wash cloth over your closed fist.

Use your index finder and poke the center of the cloth down
into your fist.

Now flip your fist over and grab the part you pushed through
with your fingers.

Now grab around the whole thing.


Lay your washcloth onto the collar end of the onsie so your "dollop"
hangs over the edge.

Now roll it up! If you roll at a slight angle, the center will sit
higher than the outer edge.


Now place the onsie into the center of your coffee filter.

Pull the edges of the filter up around the onsie and tie it off with some
ribbon!


You can add tags and other embellishments to your ribbon!


I can't wait to give these to my friend that just had her baby!

Saturday, May 7, 2011

{ a pie in a jar }

Alright! Mother's Day is tomorrow! Just in case you haven't found something for Mom, here is something she WILL LOVE! :) Pie is divine, but a pie that is just the right size for one person is to die for!  This simple little pie is just the right size and it is so cute too! Plus, Mom won't have to do all the work to make it!

What you'll need:
  1. 2 pint (or 4 half pint) wide mouth canning jars
  2. one can or jar of pie filling
  3. one recipe for pie crust (I've included one just in case)
First start by washing your jars with hot soapy water and then drying them.

Now make your pie crust. Here is the recipe that I used and it was really easy! You don't have to roll your dough out just yet! I started by just pressing pieces of dough inside my jar. Start on the bottom and then work your way up the sides of the jar. Don't go quite to the top of the jar.

Now you can fill your jar up with filling. Fill it up about a half inch shy of the top of your dough.

Roll out your remaining dough. Use the ring from your jar like a cookie cutter to make the top crust of your pie. Be sure to make a vent hole!

Now you put the top into the jar and press the edges to the dough already in the jar. Sprinkle with a tiny bit of white or brown sugar.

You can also use a crumble topping on the pie instead of dough! That would be so good!

 Bake pie (without lid) at 375 degrees until the crust is golden brown and filling is bubbling (45min - hour). Put it on a baking sheet too, just in case it bubbles over. Another great thing about these little pies is that you can put the lid on them and freeze them! Yep! That way next week when you're craving an apple or cherry pie..... you can just pull it out and put it right in the oven! You don't even have to wait for it to thaw because the canning jar is made to handle extreme temp change! Enjoy!


 I paired my pie's with a homemade apron and some fabric flower pins!
                                                    <3  HAPPY  MOTHER'S DAY! <3