Showing posts with label holiday. Show all posts

Wednesday, October 10, 2012

{ halloween burlap banner }

I pulled out my Halloween decorations finally. But, I decided to donate some of my
stuff so I could make room for some new stuff! I wanted a Halloween banner of course!


What you'll need:
* burlap
* pattern paper
* jute 
*sewing machine and thread


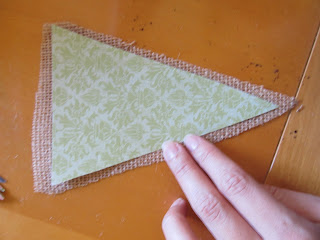
Start by cutting out burlap flags. I already had a pattern I made from another
banner project. I cut 16 flags.

I made a smaller scale of the burlap pattern for my paper. 
I had 4 patterns, so I cut 4 flags of each pattern.

Next, center your paper flag on your burlap flag and sew around all
3 sides. 


(Organizing your flags into the order you want them sewn on in advance
will prevent you from sewing on the wrong flag)

Start 1-2 feet from the end of your jute ( you may need this length
for hanging). Start sewing the jute across the top of the flag with a zigzag stitch, 
 continuously adding a new flag once you reach the end of the flag you are sewing, until you
have  added all flags. Cut jute 1-2 feet from the last flag.


You can hang your flag with tape or pins.


Friday, June 29, 2012

{ no-sew homemade american flag tank }

With the 4th of July right around the corner, here is a homemade tank 
for you to try out! Perfect for all the festivities you may be attending this 
Independance Day! 

What you'll need:

* white t-shirt
* scissors
* acrylic paint
* foam brush
* card board

Start by cutting your t-shirt! Simply cut around the neck line as low as you
like. Then cut off the sleeves. You may want to try it on before hand 
to mark where you want your new sleeve holes and neck line before cutting.


Now fit your shirt with some cardboard. Slip it in through the shirt to prevent
the paint from bleeding through to the back of your tank.


 Now start painting! I used red and turquoise. 


I started by outlining some
star shapes with the tip of my sponge brush. They don't have to be perfect.
If you prefer a more precise star, try using a stencil or some vinyl that can be
removed after painting.


Now paint your stripes. I just eyed these up. You can use wide tape
(like packing tape) to stencil in your stripes if you wish.

I wanted my flag tank to look "rocker", so I didn't worry about
perfection!

Allow the paint to dry completely before wearing. Don't wash for 24 hours
to allow the paint to set in. First wash and dry should be separate from any
other garments. After first wash and dry, the paint will be set in and you can throw
it in with your other laundry without worrying about bleeding or color transfer! 


This shirt is even cute turned inside out! :) It muted the colors
to compliment the actual flag!


Yep, I have pretty fun friends! <3


I made this shirt about 15 minutes before doing these photos! And.... it was free!
Enjoy

Tuesday, February 14, 2012

{ valentine cootie catcher }

I've procrastinated once again!
Yesterday, I decided to add a little extra to the Valentine goody
bags that Ryker is taking to school. It was a last minute idea and I
just couldn't shake it off! I made one for Ryker and he was so pleased with it
that I went ahead and made more in a very tight time schedule! 

Remember these from grade school? 
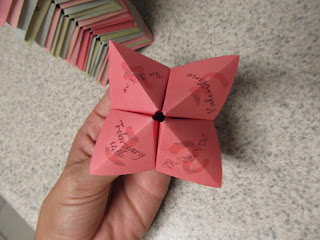
Cootie catchers, right? I made a bunch of them
that were Valentine themed. Ryker loved them. He is 
really excited to show his friends how to use them!


What you'll need:
 
* Paper
* Pen
* Printer
* Scissors or paper cutter
* Origami skills (lol)

I started out by folding up one of these cootie catchers on a white
piece of paper. I used 12x12 pattern paper for the finished
product so I cut my white paper to a 6x6 inch size so 4 will fit nicely
on each piece of pattern paper.

I thought everyone knew how to fold these. But my brother says he never
made one! Maybe it was a girl thing? I don't remember.... so here are instructions
on folding up your cootie catcher!

6x6 inch paper

Fold in half diagonally
Open; fold diagonally the opposite direction

open

Fold corner in until point touches the center.

Repeat on all four corners.

Turn over

Fold corner into the center

Repeat on all four corners.


Fold in half 

Put your finger between these flaps

pull out on all four flaps.


That's it!

 Now you're ready to write on it! 


I scanned this onto the computer and opened it into 
a photo editing program. I added a transparent layer and then
 simply typed all of these words in
different fonts and then set them directly over the area I
wrote it. When I was done, I just removed this image. 

This is the finished image.

Now cut your 12 x 12's down to (4) 6 x 6's.


I opened my image in Microsoft Word and set my paper size to
6 x 6 inches. Now print!

And fold! 


{ Happy Valentine's Day! }

Monday, February 6, 2012

{ valentine wreath }


I really had no idea what to do for my Valentine wreath. 
So I was easy on myself.

Look familiar? 
Yep... this is my Christmas wreath
I just removed the ornaments and added mini flags!
These mini flags are no sew as well! So
easy is probably an understatement! 


What you'll need:

* Fabric
* Scissors
* Fabric glue
* Ric rac
* Fabric paint


I used the scraps from my Valentine inspired banner. My flags are 
only about an inch wide. Cut out as many as you need for your project. 
I used 21. 

I used Aleene's Fast Grab tacky glue to attach the flags to
the ric rac.  

Put a small glue strip of glue across the top of your flag.

Lay your ric rac on top of the glue strip.

Continue until your strip is long enough for your projects. Leave
some extra length on the ends to attach them.

I used some fabric paint to put a small heart on some of the flags.

Now remove the glass and backing from your frame.
I left the burlap that was in there before.

Lay your flags out on top of the glass.

Tape the ends to the backing.

Put your frame back together.

Add a bow on top!
( this is even the same bow from Christmas)
This frame is cute as wall art or...

A door wreath!


Total cost: Free! 

You can see my Christmas frame wreath here