Showing posts with label sewing. Show all posts

Friday, September 28, 2012

{ almost sandals } bare foot wear

My sister just got married! I'm so happy for her and
her new husband! They are wonderful together!
Being the oldest sister and all, I was asked to make
some things for the wedding. One thing was to make
some "almost sandals". My sister wanted
the simplicity of bare feet but she wanted it to look put
together at the same time. So, this is what I came
up with!
 
 
My mother went to the store to get yarn and came back
with this stuff. It turned out to work better than I
could have hoped!
 
What you'll need:
* mesh yarn/ netted yarn
* scissors
*string
*pearl bead
 
I started by generally measuring the foot from the
toe webbing to the ankle and then adding another inch.
Double this length. Cut two pieces (one for each foot).


Tie the two ends together in a knot.
 
Cut a length of netted yarn that will wrap
and tie around your ankle.
 ( you will need two of these as well)
Thread it through the loop created in the
original strip.
 
Now you can spread the netting out to create
a triangle.
 
Next to your knot, spread the netting out so
you have a hole.
 
Slip your second toe through this hole. The knot
should comfortably sit in the crevice where
your toes meet the ball of your foot.
 
Spread the netting out
 
 Tie the ankle strap in a bow on the side.
 
Thread a short piece of string through a pearl bead.
 
Tie the string in around the thinnest area
of netting, near the toe.
 
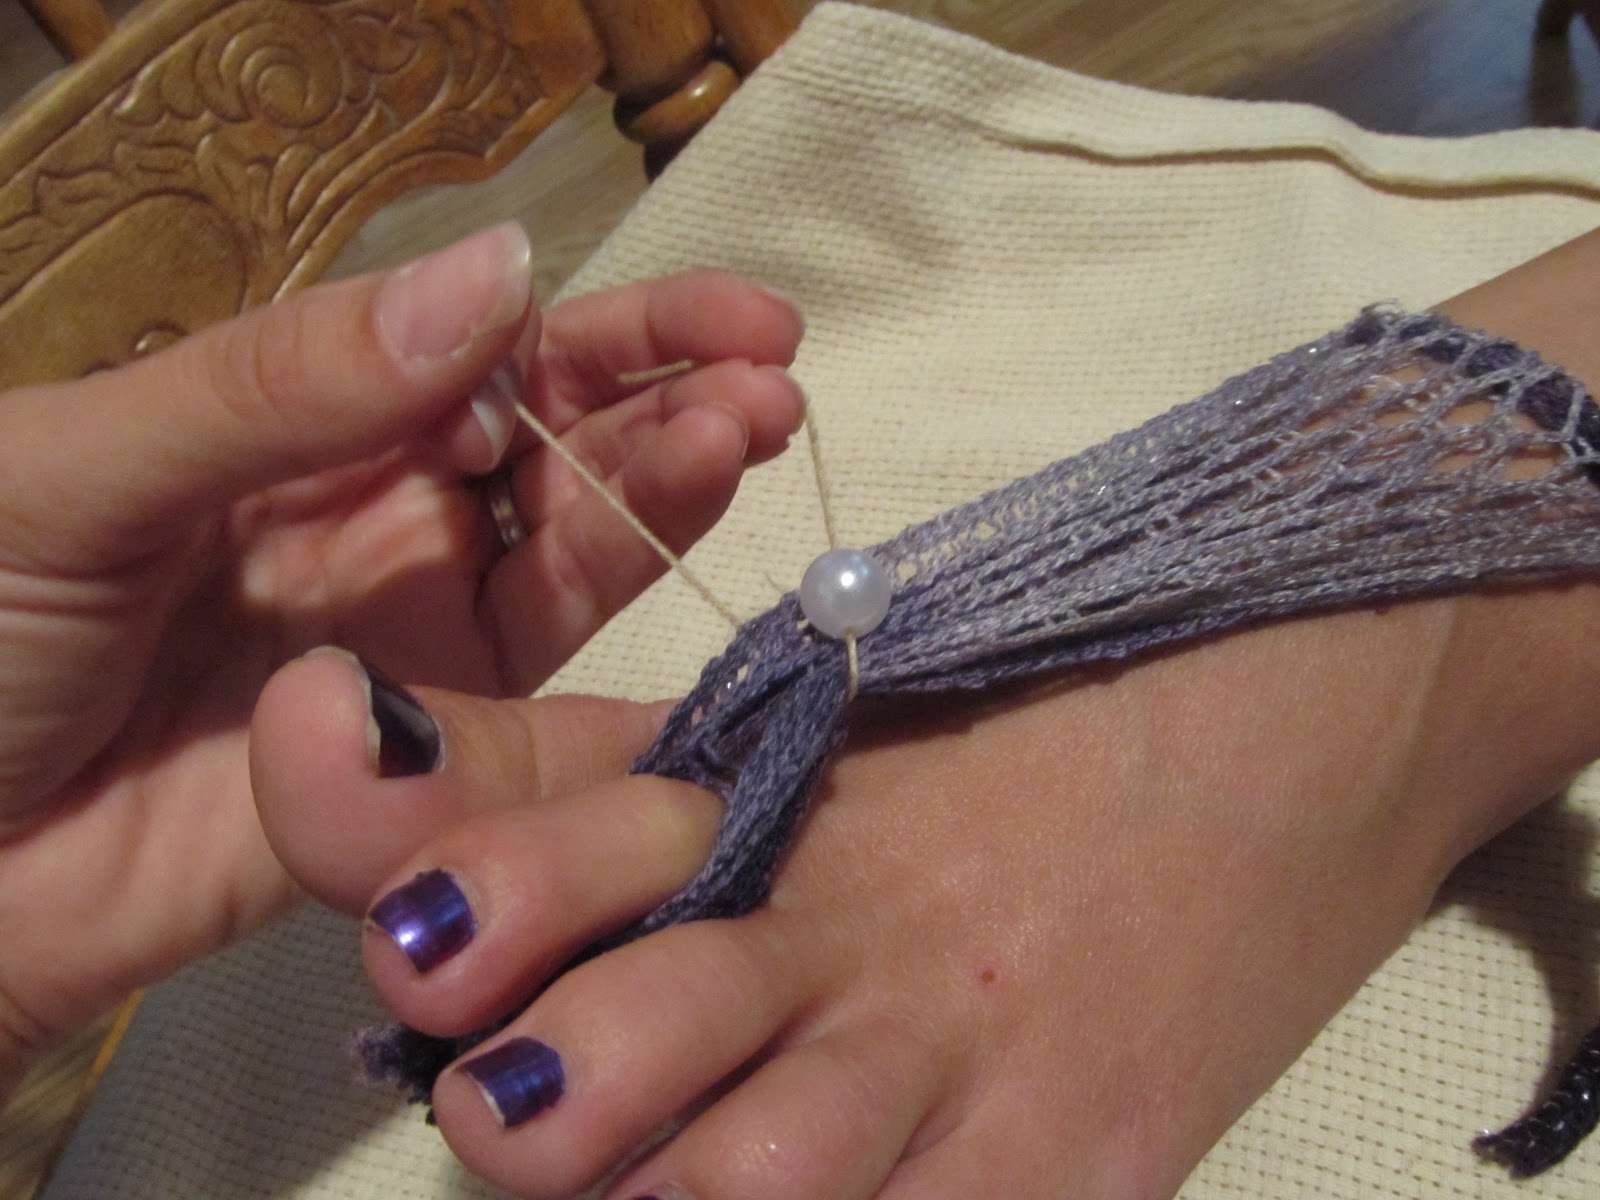
Slide it down. Cut off excess string.


That's it! So simple!


Tuesday, September 25, 2012

{ vintage, rustic ring bearer pillow }

In the last minutes of preparing for my sisters
wedding, I threw together a simple ring bearer pillow.
We intended on using burlap but found this lovely
weaved fabric. Reminds me of an old blanket.
 
What you'll need:
* fabric for the pillow
* fabric for the heart
* tulle
* ribbon
* jute
* sewing machine and thread
 
Cut two 9" squares from your pillow fabric.
Set back piece aside.
 
Cut out 4 pieces of tulle measuring
5x4 inches.
 
Cut out one heart from coordinating fabric
approximately 4x3 inches.

Pin heart, tulle and front piece of pillow fabric
together in that order.
 
Sew around the outside of the heart.
Remove pins.
 
Sew jute and ribbon to  the center of the heart
with a zigzag stitch.

 
Now sew the back pillow fabric to the front
pillow fabric with a 1 inch seam.
Wrong sides together.
Be careful not to sew the ribbon and jute into your
seam. Leave a 3-4 inch opening for stuffing the pillow.
 
Stuff the pillow.
 
Sew opening closed.
 
I had a fun time taking pictures of this one!

 
Enjoy!


Tuesday, September 18, 2012

{ mr. & mrs. } banner

Another wedding banner!
No wedding should be without something that says
Mr. & Mrs.
 
 
What you'll need:
 
* burlap
* scissors
* sewing machine and thread
* jute
* ribbon
* embellishments
 
I cut out a 5 inch wide pattern for my flags from some
cardboard. And then cut out 6 flags.

 
I took the flags to my local T-shirt shop and
had them add the lettering to each flag
individually in the font and size of my choice.
I requested 3 inch lettering.
 
When I got my completed pieces home, I
simply sewed a running strand of jute across
the top edge of my burlap flags.
 
I left a small
space on either side of the "&"
for embellishments.
 
Hot glue satin flowers in the spaces.
 
 
Tie ribbon to either end of the banner.


Friday, September 14, 2012

{ candy bar banner }

I have always liked the ideas of a candy buffet as
wedding favors. It's colorful, fun, and can
be dressed up so cute. When my little sister told
me she wanted to do a candy buffet, I was so
excited! So of course a banner is my first move
to decorate the table!
 
 
I wanted to try a new thing with this banner. I usually
paint letters on them. This time around I visited my
local vinyl and T-shirt shop. They pressed these
letters on in any size and font I wanted! So not only
did I get exactly what I wanted, it took no time at all!YAY!
 
What you'll need:
* burlap
* jute
* scissors
* sewing machine
 
I like to make a template when making banners. It
ensures that all of my pieces will be uniform. I
made a cardboard triangle that measured 5" across
the top. Then, I cut out 9 triangles form the burlap.

I put them in a bag and took them to the vinyl shop.
 
They cut and pressed 3" letters on each flag.

 
Now all I had to do was simply sew a running
strand of jute to the top of the flags using a
zigzag stitch.

 
~simple and sweet~
 
enjoy


Wednesday, February 29, 2012

{ spring burlap banner }

Spring is such a beautiful time of year! All of my orchids are blooming, my Easter lily's 
are really close to blooming and even my banana tree is blooming! I just love all
the bright colors and especially the smell of rain! Although we get plenty of rain
here throughout the year and flowers are always blooming, 
you can definitely feel that it is 
SPRING!

I really like burlap! It has such an earthy look to it. I thought it would be perfect
for a spring banner. Plus, I figured out an easy way to prevent your burlap
from fraying on every cut! 

What you'll need:
* Burlap
* Mod Podge
* Craft paint
* Sponge dabber brush
* Scissors
* Jute
* Sewing machine with matching thread
* Cricut (optional)

Start by laying something down on your work area. I used a long piece
of plastic wrap. I  don't want my work to stick to paper or the table. 
Then lay a piece of burlap down on top.

Now dab your sponge brush into some Mod Podge and start
dabbing it onto the burlap. You want to cover the whole piece.
The more you use, the stiffer it will be! So base your thickness on how
firm you want your burlap in the end.

Allow the burlap to dry completely (even the opposite side will be damp 
with Mod Podge)!

I used some white paint and dabbed a very small amount over my entire piece.
Let this dry.


Now to make a pattern for  your flags.
I used a small envelope, folded it in half, and cut off the corner.


 Now cut out your flags, using your pattern.


Using your Cricut, cut out your letters and shapes on some scrap paper.
I used George and basic shapes cartridge.

Now use the outside piece like a stencil. Dab the color of your
choice onto each flag

Make sure you keep the inside of the 'P' and 'R'  so you can hold them
into place while you paint.

If you don't have a Cricut, you can use a paintbrush to paint your letters on!
Let the paint dry completely.

I added a vintage button on the center of each flower as well.

Now it's time to put the flag together. Lay the flags out in the 
order they will be attached to avoid sewing them on wrong.

Line your jute up in the center of your pressure foot over the top of your flag.
Using a wide zigzag stitch on the sewing machine you sew the jute
down the top of each flag, adding the next flag without stopping or cutting
thread.

Make sure you leave a long end on the jute for tying off your banner.

And your done!