I've never really had a tree skirt because I've never
really liked any that I've seen! They're either too
country, too traditional or just not my style in general.
The other day, I decided that I needed one though!
So I started searching the web for inspiration and
found one that caught my eye from Garnet Hill!
I had to remake it for myself! It was
from last year so they don't even sell it anymore
but it's perfect for me since it can go with
whatever I decide to decorate with next year!
What you'll need:
* 1 and1/4 yards of felt
* Scissors
* Sewing machine and thread
* Hot glue
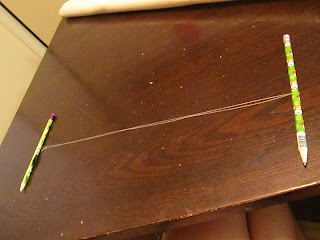
* 2 pencils and string or thread
(Sorry that some of my photos are dark! I started
working on this in the late evening! )
I started by squaring off my felt, and setting
the extra aside. It was a squared piece
about 36 inches across. I took a piece of string, and made
it 36 inches long. Tie the two ends together. Now put your
pencils in the looped string. Now, from pencil to pencil
should roughly be your radius ( measurement from
center of a circle to the outer edge).
Now hold one pencil in the center of your felt
square. ( If your piece is a perfect square, you can
find the center by folding it in half and then in
half again the other way. The folded corner will be your center point.)
Now pull your string tight with a pencil in each
hand. Draw with your outer pencil, keeping your string
tight and center pencil still, around in a circle. This is similar to using
a protractor in math class!
Using any small round object, draw a circle in the
center for the tree trunk. I used a small Tupperware lid.
Now, using a ruler or straight edge, draw a line from the
center point to the outer edge of your circle.
( ignore my first line... it obviously wan't straight! haha)
Cut everything out and cut down the straight line.

Keep all of your scraps, you'll need them to cut out all of
these little strips to make the poinsettias. Cut out
as many as you can with the scraps you have. I cut out
over 300 of them! They are 3 inches long and 1/2 an
inch wide. I cute out 3 layers at a time and
it sped up the process!
Once you've cut out all of your strips you need to
Fold it in half.
Slide it under the presser foot, centered.
Sew down and back stitch.
Do not cut the thread. Repeat with
remaining strips.
You will end up with a long strip of these if you leave
the thread uncut. At the end, you can cut them all apart.
The next step is to assemble the poinsettias. Use a
very small dab of hot glue to the center of
Now add another strip to the top, perpendicular.
Add a third strip to half of your poinsettias.
You will have half " x "shaped and half "* " shaped.
Now stagger them around the edge of your skirt
before attaching them to be sure you have enough to
go around and to make sure you don't put too
many in an area.
Now use a dab of hot glue to the bottom of each
and attach to your skirt about half inch from the edge.
You can add ribbon to the bottom side of the
skirt, down the opening, to tie it shut.
I haven't added my ribbon yet because I didn't have
a coordinating color on hand!
Cute, huh!?
Total cost?...... $4
Enjoy!


No comments:
Post a Comment