Tuesday, September 27, 2011

{ iced coffee } recipe

I am not an avid coffee drinker, but I do enjoy a cup
once in a while. When I do, I need two creamers
and 5 sugars! :) I want my coffee to be mostly sweet!
And I do prefer it to be cold; iced or blended!
I came across this iced coffee recipe on Pintrest (I'm addicted)
and had to try it! Click here for the original link!


There are two parts to the recipe! There's the concentrated
coffee and the sweet cream. Hope you like!

Coffee Concentrate
Ingredients:
  • 1 gallon of water (preferably bottled)
  • 16 oz. bag of COARSE ground coffee
  • Coffee filters or several layers of cheesecloth

I've been told coffee is better when it is cold brewed. When
you cold brew, the coffee isn't as bitter or acidic! It's the best way
to have iced and blended coffee! The process takes time
but is worth the result!

Directions:
Get a very large bowl and pour your water into it. I didn't
have a bowl big enough for a gallon of water and the coffee so I
used two large bowls.
Pour your coffee grounds directly into the water. Make
sure you stir it to get all of the coffee wet. This mixture
looks something like mud! :)
My neighbors daughter thought I was making brownies!


Cover your bowl and leave at room temperature
 for about 12 hours or overnight.


Now that your coffee has had time to brew, you have to
strain all of the grounds out. This is why coarse
ground coffee works best. Most of it will
have settled to the bottom so try not
to stir it up too much and it will make the straining
process much faster.

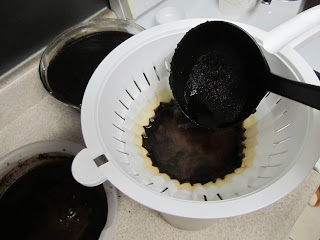
Line a strainer with coffee filter(s).


Then place your strainer over a pitcher.


Use a ladle to poor the coffee into the filter.
I fit two to three ladles full each time. I recommend
changing your filter out after each fill. It will filter faster
and cleaner this way.

This part takes a while! I just walked away and
did my usual stuff in between filtering.


Once I was done filtering I poured my coffee
back into the gallon jug that I bought my water in!


This is pretty strong coffee! So beware before
drinking straight! :) This coffee will stay good
in your fridge for a MONTH!


Sweet Cream
Ingredients:
  • 12 oz can of evaporated milk
  • 14 oz can of sweetened condensed milk
Directions:
You simply combine the two cans of milk!

The sweetened condensed milk is thick so make sure you
get it mixed in well. Refrigerate. I put mine in a water
bottle!

Iced Coffee

Directions:

Fill your glass full of ice.

 Pour coffee
concentrate over ice until glass is a little more that
half full.


Now fill your glass the rest of the way with your
sweet cream!


Stir and Enjoy!


For a blended coffee, pour into a blender!

You can add a little vanilla extract, chocolate syrup
or caramel! And it would be fantastic with some homemade
whipped cream on top! :)
FYI
For all of my ingredients, I spent about $10! I can't even
buy 2 iced or blended coffees from Starbucks
 (or even McDonald's) for that price!
 I LOVE saving money! :)

Monday, September 26, 2011

{ flag banner }

I'm sure you've seen these cute banners all over the
internet! Maybe even in peoples homes. Well, I now
have them in mine! It's such an easy project for so many
occasions or even decor.

The idea to make the banner came to me a few days ago
while I was making a list of things to get for my son's
birthday party. Yep... My big boy turned
 6! :) So I went ahead and pulled out my
paper!

My obsession with old literature and the paper it's made
from has inspired me a LOT! I want to put it on everything!
So although book pages are my paper of choice, you can
use any paper you want for this project!

What you'll need:
1.   Paper (printer paper, card stock, construction paper,
 book pages; whatever kind you want)

2.   Ribbon, yarn, or string ( again, whatever you want)

3. Scissors(or paper cutter) and glue.

4.   Sewing machine and/or printer (optional)


OK... So I printed my letters onto my paper with a
computer and printer. I used half sheets of paper. I just cut
them down to size. I set my margins to match that of
my paper, used the center alignment, and put one
letter per page. You can use stamps or even
just write your letters on with a marker
.

I found the center of my paper using a ruler and 
 marked it at the bottom of my paper. This is just
so I knew my letter would be center in my triangle.


I then cut from that center point to the top left corner of
my paper and then from that point to the top  right
corner. You should have an even triangle and
your letter should be centered.


Next I glued them onto colored card stock.

Now cut them out again using your scissors or paper
cutter. The card stock should be bigger than
your letter paper so you can see the color! That's
it for your flags!


For the birthday banner I used blue ribbon to hang it.
I sewed the ribbon to the front of each triangle
using the sewing machine and
overlapped them a little bit so it wouldn't
be too big for my front door.


For the "Boo" banner, I attached ric-rac using the
sewing machine. I only tacked it down on each side
of the triangle. I left a one inch gap between the
letters because it's a smaller banner.

For the "love" banner, I left an extra inch at the
top of each flag and just folded it over
my textured yarn and secured them on with
clothes pins for a cute vintage look!


These are just three simple ways to hang your
flags. Don't forget to  leave enough ribbon/string
at the ends to hang it! Can't wait to hang my "Boo"
banner on my door this October!


Tuesday, September 20, 2011

{ sopapillas } recipe

Ryker had his ohana project due at school this week. He
was asked to bring a snack that pertained to his
ethnicity.... ummm.. OK... O_o  After I panicked for a second I
called my dad and said, " should I make nachos or something?"
He suggested I make those cinnamon-sugar things that you
can get from ANY Mexican restaurant. DUH! What 5 or 6 year old
would want nachos over sugar? None! So that's what I made!
BTW: they aren't called cinnamon-sugar things! They are
called sopapillas!

Ingredients:
  • Tortillas ( I use 100% whole wheat)
  • oil for frying
  • your own cinnamon sugar mixture
  • zip-lock bag
Put cinnamon-sugar mixture into a zip-lock bag and set aside.
You only need a little cinnamon compared to the amount
of sugar. Maybe one cup sugar and a tbsp cinnamon.


So first I took a pizza cutter and cut my tortillas into half inch
strips. Then I cut them in half so they weren't so long.

Next, heat a small amount of oil in a frying pan. I used about
1/8 cup. Don't get it too hot! These cook so fast! I'd put your
temp about half way between low and medium heat!

Now lay your tortilla strips in the hot oil. You will see the edges
start to brown and the center start to bubble VERY quickly!

Turn them and let them brown on the other side.

Once both sides have browned, take them out and set them on a
paper towel for a moment to soak up some of the oil. Then put
into you cinnamon-sugar filled zip-lock. Close it and shake
to coat the strips in sweetness.


Remove from the bag and eat!

I also made little square ones! They reminded me of
that cinnamon cereal! :)
Thanks Dad! :) I love you!

{ picture book }

Trying to find a cute way to display your photos? Here's one!
It's so simple and you can change the photos out as you please!

What you'll need:
  1. A hard back book
  2. Clothes pins
  3. Photos


All you do is simply use the clothes pins to hold your picture onto
the cover of the book!

I removed the paper cover from my book so that it looks a little
older than it really is. I just picked up this book from Salvation Army.
I think it was $1.00! I also wrote on my Polaroid type photos.

I also tried it putting the photos inside of the book! It was
so cute, too! I love this idea for a night stand or a coffee table!


There is nothing to it! It's such a cute vintage/shabby chic look
that I really enjoy! I can't wait to share all of my "old book" ideas!
I have a lot coming!


Thursday, September 15, 2011

{ chicken strips } recipe

Here's a little recipe that is simple and delicious! The best thing about
this recipe for me and my family is that EVERYONE likes it! Yes,
even Ryker! He likes it so much that it has a different name at my
house.... Ryker's chicken! Enjoy!


Ingredients:  
  • 2 cups all-purpose flour
  • 3-4 boneless skinless chicken breast
  • 1 egg
  • 1 cup milk
  • vegetable oil for frying
  • seasoning to taste

Directions:

1. Start by mixing your flour and your seasonings together in a
medium size bowl; set aside.
2. Now mix your egg and milk together in a separate bowl; set
it aside.


3. Cut your chicken breast into 1 inch strips

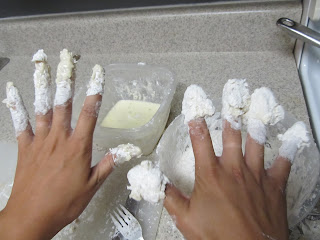
4. Here is the messy part.... take on strip of chicken and dip it into
the egg mixture.

 Now put it into the flour mixture.

 Take the
same piece and dip it back into the egg mixture.

 And one more
time back into the flour mixture for a total of twice in the egg and
twice in the flour.

This  double dipping method creates a thicker coating that 
is super yummy! Plus, it keeps your chicken
nice and moist! You can even dip it a third time if your up to it! :)

LOL... You can avoid THIS by using one hand for flour and
one hand for egg!

5. Continue step 4 on all strips and lay them on a metal  cookie sheet.
Once you've coated all of your strips, put them in the refrigerator for
at LEAST 20 minutes. This will help the batter stay on the chicken
when you start frying it.

6. Heat about 1/2 inch of oil in a frying pan on about medium heat;
fry batches of chicken
until golden brown, turning once. Make sure juices are clear
and/or internal temp reaches 170 degrees.


Done!

We eat these in so many ways! Jake loves his
on top of big salad with cheese and ranch dressing. The kids
eat theirs as finger food with ranch dressing as dipping sauce.
I LOVE mine spicy! If your family likes 'em spicy too, just add this
simple twist:
  • 1/4 cup hot pepper sauce ( like Frank's Red Hot)
  • 1 Tbsp. butter
Put them together in a microwaveable bowl and warm them until
the butter is melted. Stir and pour over cooked chicken strips!
The spicy ones are still fantastic on top of a salad or just dipped
in some dressing!

Enjoy!